
We successfully built a zero-dependency Mailchimp clone in Rails: Mailstify. Our application securely manages audiences, allows rich campaign creation, and crucially handles asynchronous bulk dispatch using Solid Queue.
This final chapter is about polish. We need to close the feedback loop so the user knows if their campaign is actually "Sent" and how many emails went out. We'll wrap up by reviewing the full native architecture and discussing the next steps for a real production environment.
Mailstify Table of Contents
- Mailstify #1 - The Audience Blueprint: Structuring Models for Integrity
- Mailstify #2 - User Identity and Multi-Tenancy (Built-in Auth)
- Mailstify #3 - Go Dynamic! Building Real-Time Audience Lists (The Hotwire Way)
- Mailstify #4 - Design the Campaign: Rich Content with Action Text
- Mailstify #5 - Email Logic and Previews (Action Mailer)
- Mailstify #6: Asynchronous Bulk Dispatch (Solid Queue)
- Mailstify #7: Finalizing, Cleanup, and Conclusion 👈 (You are here)
1. Implementing the Campaign Status Indicator
Currently, when a user clicks "Send," the campaign remains visually unchanged, even though the CampaignDispatchJob is running in the background. We need to update the Campaign model with a status column and use it to control the UI.
A. Add the Status Column
We'll use an integer column with a Rails enum for reliable status tracking.
bin/rails generate migration AddDispatchStatusToCampaigns status:integer
And update the migration file to add default value db/migrate/<timestamp>_add_dispatch_status_to_campaigns.rb
class AddDispatchStatusToCampaigns < ActiveRecord::Migration[8.0]
  def change
    add_column :campaigns, :dispatch_status, :integer, default: 0, null: false
  end
end
Run the migration:
bin/rails db:migrate
B. Configure the Status `enum`
Define the possible states in app/models/campaign.rb. We'll set the default to :draft (because the schema set the default to 0).
# app/models/campaign.rb

class Campaign < ApplicationRecord
  # ... existing code ...

  # New: Define the status enum
  enum :dispatch_status, { draft: 0, sending: 1, sent: 2 }

  # ... existing code ...
end
C. Update the Job and Controller
Now we activate the status updates we commented out in Part 6.
- Update the Job (
app/jobs/campaign_dispatch_job.rb). We'll wrap the core logic in abegin/ensure/rescueblock to handle status updates even if an error occurs.
# app/jobs/campaign_dispatch_job.rb (Updated perform method)

  def perform(campaign)
    @campaign = campaign.reload
    @list = @campaign.list

    @campaign.update!(dispatch_status: :sending) # Use dispatch_status

    begin
      @list.subscribers.find_each do |subscriber|
        CampaignMailer.campaign_email(@campaign, subscriber).deliver_later
      end

      @campaign.update!(dispatch_status: :sent) # Use dispatch_status

    rescue => e
      @campaign.update!(dispatch_status: :draft) # Use dispatch_status
      Rails.logger.error "Campaign Dispatch Failed for #{@campaign.id}: #{e.message}"
      raise
    end
  end
- Update the Controller (
app/controllers/campaigns_controller.rb). Insend_campaign, we immediately check if the campaign is already sent, preventing accidental re-dispatch.
# app/controllers/campaigns_controller.rb (send_campaign method)

def send_campaign
  @campaign = Current.user.campaigns.find(params[:id])

  # New: Prevent sending a campaign that is already sent or sending
  if @campaign.sent? || @campaign.sending?
    redirect_to @campaign, alert: "This campaign is already in progress or has been sent." and return
  end

  unless @campaign.body.present?
    redirect_to @campaign, alert: "Can't dispatch an empty campaign!" and return
  end

  CampaignDispatchJob.perform_later(@campaign)

  # We intentionally do not update the status here; the job handles :sending
  redirect_to @campaign, notice: "Campaign dispatch job enqueued! Emails will be sent shortly."
rescue ActiveRecord::RecordNotFound
  redirect_to lists_url, alert: "Campaign not found or unauthorized access."
end
D. Display Status in the UI
Update the Campaign Preview (app/views/campaigns/show.html.erb) to visually display the status and control the button's visibility.
<% status = @campaign.dispatch_status || "draft" %>
<% status_color = case status
                  when 'draft' then 'bg-gray-500'
                  when 'sending' then 'bg-yellow-500 animate-pulse'
                  when 'sent' then 'bg-green-600'
                  end %>

<div class="flex justify-between items-start mb-6 border-b pb-4">
  <div>
    # old buttons ...

    <%# NEW: Status Indicator %>
        <span class="inline-flex items-center rounded-full px-3 py-1 text-sm font-semibold text-white mt-2 <%= status_color %>">
      Status: <%= status.humanize %>
    </span>

  <div class="flex space-x-3">
	  # new condition rendering
    <% if status == "draft" %>
      <%= button_to "Send Campaign Now",
                    send_campaign_campaign_path(@campaign),
                    method: :post,
                    data: { turbo_confirm: "Are you sure you want to send this to #{@campaign.list.subscribers.count} subscribers?" },
                    class: "bg-green-600 text-white font-semibold py-2 px-4 rounded-lg shadow-md cursor-pointer hover:bg-green-700 transition duration-150" %>
    <% else %>
      <button class="py-2 px-4 rounded-lg shadow-md font-bold text-white <%= status_color %> opacity-80" disabled>
        <%= status.humanize %>...
      </button>
    <% end %>

    # ... rest of code ...
  </div>
</div>
2. Basic History Log / Counter
Since we are delegating email sending to the ActionMailer::MailDeliveryJob, tracking success is often done by listening for mailer events. For this simple clone, we will use a basic counter stored on the Campaign itself.
A. Add the Counter Column
We'll add a simple integer to hold the count of successfully sent emails.
bin/rails generate migration AddSentCountToCampaigns sent_count:integer
bin/rails db:migrate
B. Increment the Counter
Instead of having the CampaignDispatchJob update the counter (which would be slow due to the lock overhead), the mailer job should update the count immediately after a successful delivery.
Update the
CampaignModel to accept atomic counter updates.# app/models/campaign.rb # ... inside Campaign class ... # New: Method to atomically increment the counter def self.increment_sent_count_and_check_status(campaign_id) # Use find_by to avoid raising if the campaign is deleted campaign = Campaign.find_by(id: campaign_id) return unless campaign # 1. Atomically increment the count campaign.increment!(:sent_count) # 2. Re-fetch the current count (crucial for concurrency) current_count = campaign.reload.sent_count || 0 total_subscribers = campaign.list.subscribers.count # 3. Check if the job is complete if current_count >= total_subscribers # Use update_column to skip callbacks/validations for a quick update campaign.update_column(:dispatch_status, Campaign.dispatch_statuses[:sent]) end endUpdate the Mailer Job (
app/mailers/campaign_mailer.rb). We must add aafter_actionhook that runs only after a successful email delivery.# app/mailers/campaign_mailer.rb class CampaignMailer < ApplicationMailer # New: Callback runs after successful email creation/delivery after_action :track_sent_count, only: [:campaign_email] def campaign_email(campaign, subscriber) @campaign = campaign @subscriber = subscriber # Store the campaign ID in the mail object's header for the callback to use headers["X-Campaign-ID"] = @campaign.id mail( to: @subscriber.email, subject: @campaign.subject, from: "Mailstify <noreply@mailstify.com>" ) end private def track_sent_count # Check if the email was successfully sent (not just created) if message.perform_deliveries campaign_id = message.header["X-Campaign-ID"].to_s.to_i # Call the new method to increment AND check for completion Campaign.increment_sent_count_and_check_status(campaign_id) end end end
C. Display the Counter
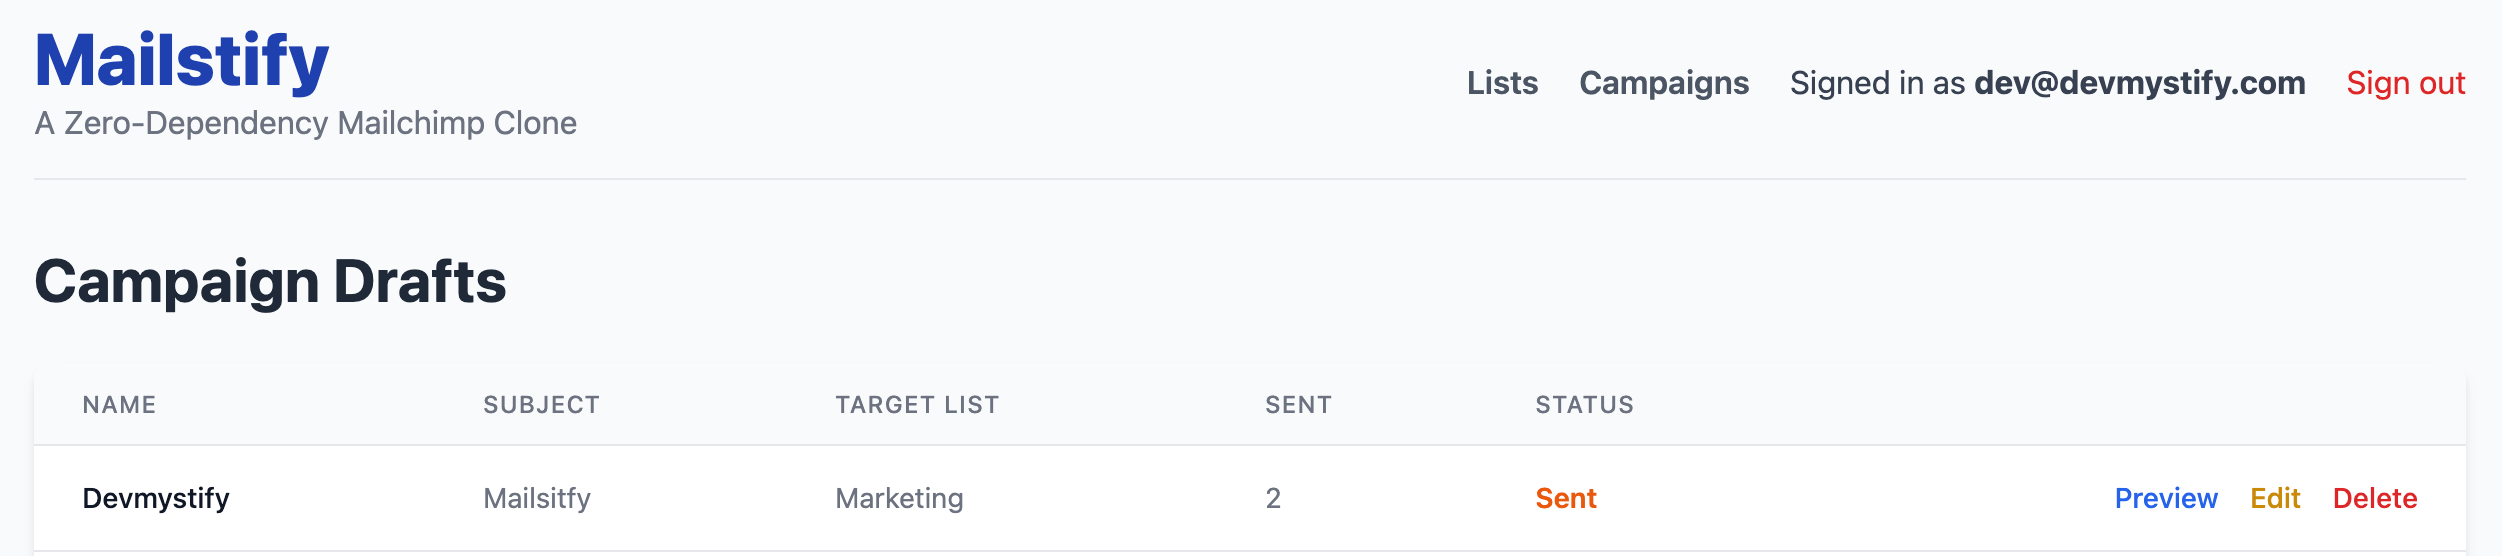
Update the Campaign Index and Show views to display the counter and make the status column displays status properly.
<%# app/views/campaigns/index.html.erb (Add a new column) %>
<th class="px-6 py-3 text-left text-xs font-medium text-gray-500 uppercase tracking-wider">Sent</th>
<th class="px-6 py-3 text-left text-xs font-medium text-gray-500 uppercase tracking-wider">Status</th>
<%# ... inside the loop ... %>
<td class="px-6 py-4 whitespace-nowrap text-sm text-gray-500"><%= campaign.sent_count || 0 %></td>
<td class="px-6 py-4 whitespace-nowrap text-sm font-semibold text-orange-600">
	<%= campaign.dispatch_status&.humanize || 'Draft' %>
</td>
<%# app/views/campaigns/show.html.erb (Under the status) %>

<span class="inline-flex items-center rounded-full px-3 py-1 text-sm font-semibold text-gray-700 mt-2 ml-4 bg-blue-100">
      Sent Count: <%= @campaign.sent_count || 0 %>
</span>
Time to see if it works! This list has two subscribers.
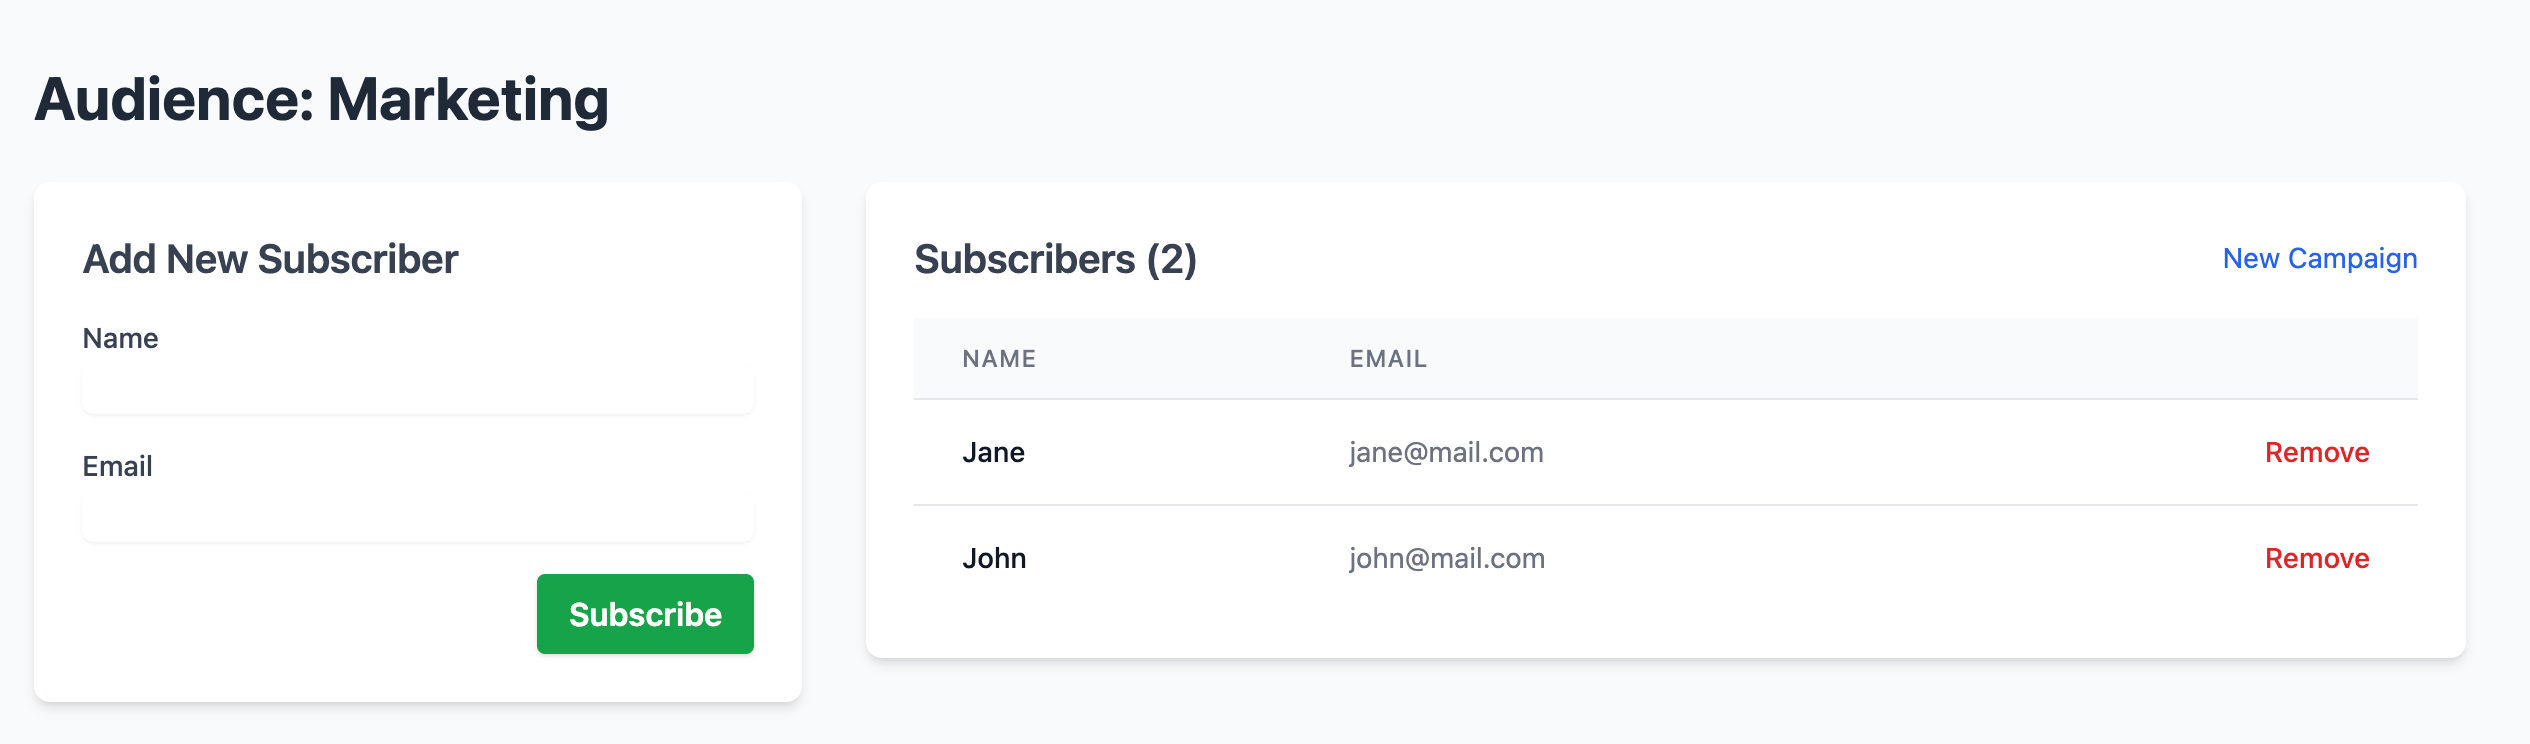

When we sent the emails, the sent count immediately went up to 2. It worked!
3. Reviewing the Zero-Dependency Architecture
Mailstify is complete and runs entirely on the core Rails 8 stack:
- Front-end & Dynamics: Hotwire (Turbo Frames & Streams) for real-time audience management. (Zero JavaScript Frameworks)
- Authentication: Built-in Rails Authentication (
has_secure_password). (Zero Devise/Auth Gems) - Rich Content: Action Text (Trix Editor). (Zero External Editors)
- Asynchronous Jobs: Solid Queue (Active Job backend). (Zero Redis/Sidekiq)
This architecture proves that Rails is a hyper-efficient, self-contained ecosystem capable of building complex, professional-grade applications.
4. Summary and Next Steps for Production
We have achieved the goal of building a functional Mailchimp clone. For a real production deployment, here are the key next steps:
- Email Service Provider (ESP): Replace Rails' development mailer with a production ESP (SendGrid, Postmark, AWS SES) using the
config/environments/production.rbconfiguration. - Solid Queue Deployment: Configure the necessary environment variables and host a dedicated, persistent worker process (e.g., using a managed service like
Fly.io
or Render) that runs the
solid_queue:startcommand. - Database Scalability: For SQLite, consider PostgreSQL or MySQL for better concurrent write performance under heavy traffic.
Congratulations on building Mailstify!
You've mastered the modern, zero-dependency Rails stack to create a professional application. If you have any further questions or would like to discuss deployment strategies, feel free to ask!
