

Amazon S3 is one of the most widely used services for storing assets and media. In this guide, we’ll look at how to upload images from a Next.js app to S3, one of today’s most popular web frameworks.
I’ll walk you through two common approaches:
- Using a traditional API Route (works with either the Pages Router or the App Router)
- Using a Server Action (a new feature for the App Router and server components only)
Step 1: Set Up Your AWS S3 Bucket and IAM User
Before we write any code, you've got to configure your AWS environment. I won't go into detail about this because it could be a whole tutorial on its own, but I'll outline exactly what you need to do to follow along:
- Create an S3 Bucket: This is literally what the bullet point says. Go to your AWS S3 console and create a new general bucket. Be sure to give it a unique name.
- Create an IAM User: In the AWS IAM console, create a new user and grant this user access to your S3 bucket.
- Attach an IAM Policy: Attach a policy to the user that allows specific actions, such as
s3:PutObjectands3:GetObject, on your S3 bucket. - Get Your Keys Ready: After creating a user, you'll receive an Access Key ID and a Secret Access Key. Keep these keys safe in your Next.js project's environment file.
Step 2: Configure Your Next.js Application
You can either use an existing Next.js project or just start over with me.
npx create-next-app@latest s3-tutorial --yes
cd s3-tutorial
npm run dev
Now that we have a clean new project, the next step is to install the necessary dependencies.
npm install @aws-sdk/client-s3
@aws-sdk/client-s3: This is what you'll use to create the AWS Client, which essentially connects your app with AWS S3.
The next file for your Next.js project is .env, and it should be located in the root directory.
AWS_REGION=your_aws_region
AWS_ACCESS_KEY_ID=your_access_key_id
AWS_SECRET_ACCESS_KEY=your_secret_access_key
AWS_S3_BUCKET_NAME=your_s3_bucket_name
Note: The environment variables prefixed with NEXT_PUBLIC_ are exposed to the client side. So yeah, the secret keys must not be exposed to the client.
Option 1: Using an API Route
This is the classic, reliable approach that works for everyone, whether you're using the old Pages Router or the newer App Router (the syntax might be different, but I'll be focusing on the App Router).
app/api/upload/route.ts
Here are the imports we need:
import { NextResponse } from "next/server";
import { S3Client, PutObjectCommand } from "@aws-sdk/client-s3";
We'll then need to make sure we're configuring our S3 library properly with our ENVs:
const s3 = new S3Client({
  region: process.env.AWS_REGION,
  credentials: {
    accessKeyId: process.env.AWS_ACCESS_KEY_ID,
    secretAccessKey: process.env.AWS_SECRET_ACCESS_KEY,
  },
});
And then we export our POST endpoint with the uploading logic (by logic I mean it just gets the file from the form and uploads it):
export async function POST(req) {
  const form = await req.formData();
  const file = form.get("file");

  if (!file) {
    return NextResponse.json({ error: "No file" }, { status: 400 });
  }

  const key = file.name;
  const buffer = Buffer.from(await file.arrayBuffer());

  await s3.send(
    new PutObjectCommand({
      Bucket: process.env.AWS_S3_BUCKET_NAME,
      Key: key,
      Body: buffer,
      ContentType: file.type || "application/octet-stream",
    })
  );

  const url = `https://${process.env.AWS_S3_BUCKET_NAME}.s3.${
    process.env.AWS_REGION
  }.amazonaws.com/${encodeURIComponent(key)}`;
  return NextResponse.json({ url });
}
Finally, here is the full code if you just want to copy it over.
import { NextResponse } from "next/server";
import { S3Client, PutObjectCommand } from "@aws-sdk/client-s3";

const s3 = new S3Client({
  region: process.env.AWS_REGION,
  credentials: {
    accessKeyId: process.env.AWS_ACCESS_KEY_ID,
    secretAccessKey: process.env.AWS_SECRET_ACCESS_KEY,
  },
});

export async function POST(req) {
  const form = await req.formData();
  const file = form.get("file");

  if (!file) {
    return NextResponse.json({ error: "No file" }, { status: 400 });
  }

  const key = file.name;
  const buffer = Buffer.from(await file.arrayBuffer());

  await s3.send(
    new PutObjectCommand({
      Bucket: process.env.AWS_S3_BUCKET_NAME,
      Key: key,
      Body: buffer,
      ContentType: file.type || "application/octet-stream",
    })
  );

  const url = `https://${process.env.AWS_S3_BUCKET_NAME}.s3.${
    process.env.AWS_REGION
  }.amazonaws.com/${encodeURIComponent(key)}`;
  return NextResponse.json({ url });
}
For the client:
page.js
we need to import useState, declare that this is a client component, and set up three states:
'use client'

import { useState } from 'react';

export default function Home() {
  const [file, setFile] = useState(null);
  const [uploading, setUploading] = useState(false);
  const [imageUrl, setImageUrl] = useState('');

  return (
    <div>
	    Client
    </div>
  );
}
And then add two helper functions to handle the form action: one for handling file changes and one for submitting the form.
const handleFileChange = (event) => {
    if (event.target.files && event.target.files[0]) {
      setFile(event.target.files[0]);
    }
};

const handleUpload = async () => {
	if (!file) return;
	setUploading(true);

	try {
	  const formData = new FormData();
	  formData.append('file', file);

	  // call your API route, which will upload to S3 on the server
	  const response = await fetch('/api/upload', {
		method: 'POST',
		body: formData,
	  });

	  if (!response.ok) throw new Error('Upload failed');
	  const { url } = await response.json();

	  setImageUrl(url);
	} catch (err) {
	  console.error(err);
	  alert('Upload failed.');
	} finally {
	  setUploading(false);
	}
};
Finally, swap out the placeholder <div> with this form.
<div className="flex flex-col gap-4 w-1/2 mx-auto my-10">
  <h1>Image Upload to S3 (API Route)</h1>
  <input
	type="file"
	onChange={handleFileChange}
	className="border border-gray-300 rounded-md p-2
	file:border-none file:bg-blue-50 file:text-orange-500 file:rounded-md
	file:px-2 file:py-1 file:cursor-pointer"
  />
  <button
	onClick={handleUpload}
	disabled={uploading}
	className="rounded-md p-2 cursor-pointer bg-orange-500 text-black">
	{uploading ? 'Uploading...' : 'Upload Image'}
  </button>
  {imageUrl && (
	<div className="flex flex-col gap-2">
	  <img src={imageUrl} alt="Uploaded Image" className="w-full max-w-96" />
	  <p className="text-sm text-gray-500">{imageUrl}</p>
	</div>
  )}
</div>
Here’s the full code, feel free to compare or copy it as you code along.
'use client'

import { useState } from 'react';

export default function Home() {
  const [file, setFile] = useState(null);
  const [uploading, setUploading] = useState(false);
  const [imageUrl, setImageUrl] = useState('');

  const handleFileChange = (event) => {
    if (event.target.files && event.target.files[0]) {
      setFile(event.target.files[0]);
    }
  };

  const handleUpload = async () => {
    if (!file) return;
    setUploading(true);

    try {
      const formData = new FormData();
      formData.append('file', file);

      // call your API route, which will upload to S3 on the server
      const response = await fetch('/api/upload', {
        method: 'POST',
        body: formData,
      });

      if (!response.ok) throw new Error('Upload failed');
      const { url } = await response.json();

      setImageUrl(url);
    } catch (err) {
      console.error(err);
      alert('Upload failed.');
    } finally {
      setUploading(false);
    }
  };

  return (
    <div className="flex flex-col gap-4 w-1/2 mx-auto my-10">
      <h1>Image Upload to S3 (API Route)</h1>
      <input
        type="file"
        onChange={handleFileChange}
        className="border border-gray-300 rounded-md p-2
        file:border-none file:bg-blue-50 file:text-orange-500 file:rounded-md
        file:px-2 file:py-1 file:cursor-pointer"
      />
      <button
        onClick={handleUpload}
        disabled={uploading}
        className="rounded-md p-2 cursor-pointer bg-orange-500 text-black"
      >
        {uploading ? 'Uploading...' : 'Upload Image'}
      </button>
      {imageUrl && (
        <div className="flex flex-col gap-2">
          <img src={imageUrl} alt="Uploaded Image" className="w-full max-w-96" />
          <p className="text-sm text-gray-500">{imageUrl}</p>
        </div>
      )}
    </div>
  );
}
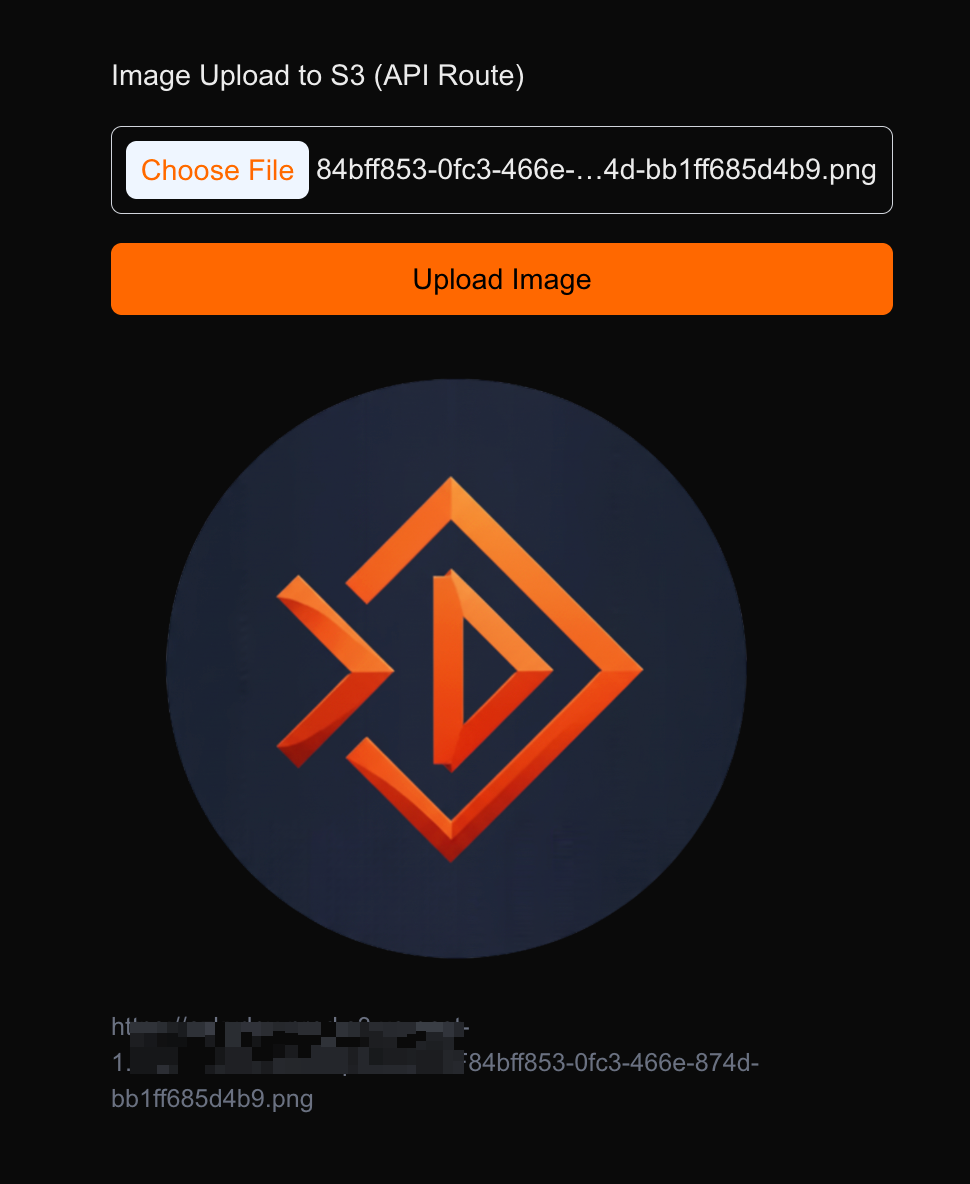
Before we move on to the next option, if you can't get a result like mine, you're probably being blocked by your S3 bucket policy. So, make sure your bucket policy is set for public read access with something like this:
{
    "Version": "2012-10-17",
    "Statement": [
        {
            "Sid": "PublicReadGetObject",
            "Effect": "Allow",
            "Principal": "*",
            "Action": "s3:GetObject",
            "Resource": "arn:aws:s3:::YOUR_BUCKET_NAME/*"
        }
    ]
}
Option 2: Upload with a Server Action
If you're using the App Router, you can use a Server Action, which is a more modern approach that lets you skip writing a separate API Route.
app/actions.js
First, import the tools and don’t forget to mark this as a server component for Next.js.
"use server";

import { S3Client, PutObjectCommand } from "@aws-sdk/client-s3";
import { redirect } from "next/navigation";
Just like in the API approach, configure the S3 client with the proper credentials.
const s3 = new S3Client({
  region: process.env.AWS_REGION,
  credentials: {
    accessKeyId: process.env.AWS_ACCESS_KEY_ID,
    secretAccessKey: process.env.AWS_SECRET_ACCESS_KEY,
  },
});
Next, export the server action that handles the image upload:
export async function uploadToS3(formData) {
  const file = formData.get("file");
  if (!file) throw new Error("No file");

  const key = file.name;
  const buffer = Buffer.from(await file.arrayBuffer());

  await s3.send(
    new PutObjectCommand({
      Bucket: process.env.AWS_S3_BUCKET_NAME,
      Key: key,
      Body: buffer,
      ContentType: file.type || "application/octet-stream",
    })
  );

  const url = `https://${process.env.AWS_S3_BUCKET_NAME}.s3.${
    process.env.AWS_REGION
  }.amazonaws.com/${encodeURIComponent(key)}`;

  redirect(url);
}
Here’s the final version of the code.
"use server";

import { S3Client, PutObjectCommand } from "@aws-sdk/client-s3";
import { redirect } from "next/navigation";

const s3 = new S3Client({
  region: process.env.AWS_REGION,
  credentials: {
    accessKeyId: process.env.AWS_ACCESS_KEY_ID,
    secretAccessKey: process.env.AWS_SECRET_ACCESS_KEY,
  },
});

export async function uploadToS3(formData) {
  const file = formData.get("file");
  if (!file) throw new Error("No file");

  const key = file.name;
  const buffer = Buffer.from(await file.arrayBuffer());

  await s3.send(
    new PutObjectCommand({
      Bucket: process.env.AWS_S3_BUCKET_NAME,
      Key: key,
      Body: buffer,
      ContentType: file.type || "application/octet-stream",
    })
  );

  const url = `https://${process.env.AWS_S3_BUCKET_NAME}.s3.${
    process.env.AWS_REGION
  }.amazonaws.com/${encodeURIComponent(key)}`;

  redirect(url);
}
For the server component:
import { uploadToS3 } from "./actions";

export default function Home() {
  return (
    <div className="flex flex-col gap-4 w-1/2 mx-auto my-10">
      <h1>Image Upload to S3 (Server Action)</h1>
      <form action={uploadToS3} className="flex flex-col gap-4">
        <input
          type="file"
          name="file"
          className="border border-gray-300 rounded-md p-2
          file:border-none file:bg-blue-50 file:text-orange-500
          file:rounded-md file:px-2 file:py-1 file:cursor-pointer"
        />
        <button
          type="submit"
          className="rounded-md p-2 cursor-pointer bg-orange-500 text-black"
        >
          Upload Image
        </button>
      </form>
    </div>
  );
}
As you can see, only server components can use Server Actions. Since a server component is server-side rendered, we can't re-render the image right on the page. While there's a way to work around this, that's not our focus, so we're just going to redirect to the uploaded image instead.
Wrap up
At this point, you might have a question: "So which one should I use?" And my cliché answer would be, "It depends on your use case and how your project is set up."
To be honest, for simply uploading an image, either of these should be fine. But if you're doing other things like transforming the image before uploading it, or mutating your data in a database to store the image URL, then you might want to think about which one suits your use case the most.
If you have any rules of thumb for choosing between the two, please let me know in the comments!